Overview
WireGuard provides a lightweight, secure VPN tunnel so you can reach your WiCAN device remotely and move CAN / telemetry data over an encrypted path.
Supported devices: WiCAN-PRO
WireGuard VPN Integration
This guide shows you how to set up and use a WireGuard VPN tunnel on the WiCAN-PRO for secure remote access
1. What WireGuard Does on WiCAN
WireGuard creates a secure, encrypted tunnel from the WiCAN device to your remote server (VPC / VPS / on‑prem gateway). Once connected, remote CAN / OBD data, diagnostics, or web API access can flow through that tunnel as if the WiCAN were on the same private network.
Typical reasons to enable it:
- Secure remote diagnostics / telemetry collection
- Access to services only exposed on a private subnet
- End‑to‑end encrypted path for future OTA / control features
2. Prerequisites
Have these ready before you start (or follow the alternative key‑generation steps below):
| Item | Description |
|---|---|
| WireGuard server | Publicly reachable endpoint (domain or IP + UDP port) running wg (e.g. on Linux, router, cloud instance) |
| Server public key | The server (peer) public key (base64 string) |
| Allowed IP ranges | The networks the WiCAN should route through the tunnel (e.g. 0.0.0.0/0 for full tunnel or 10.10.0.0/24) |
| (Optional) Preshared key | An extra layer (not always used) |
| Your WireGuard config file | A .conf file exported from server or controller (optional if doing manual setup) |
If you don’t yet have a server, you can spin one up quickly with tools like wireguard-install scripts or managed VPN platforms. (Server setup is outside scope of this doc.)
2.1 Easiest Path: Use Your Router’s Built‑In WireGuard Server
For many home / small office scenarios you do NOT need to rent a VPS. A lot of modern consumer and prosumer routers ship with a native WireGuard server feature. Examples: TP-Link (Omada / some Archer models), ASUS (Merlin firmware), GL.iNet, MikroTik, Ubiquiti, etc.
Why this is simplest:
- One-click enable: Turn on WireGuard server in the router UI.
- Auto key generation: The router creates server keys and often lets you generate/export client profiles directly.
- Integrated firewall + NAT: No extra port-forward puzzle (the router already owns the WAN interface).
- Built-in (often free) Dynamic DNS (DDNS): e.g. TP-Link provides a free hostname like
yourname.tplinkdns.com, so you don’t need a static public IP or memorise changing IPs.
Basic flow on a router (generic outline):
- Log into router admin UI.
- Enable WireGuard Server (sometimes under VPN / Advanced / VPN Server).
- Note the UDP port (keep default or choose e.g. 51820).
- Add (or auto-create) a client / peer entry named “WiCAN”.
- Export / download the client config (
.conf) OR copy the values (Server Public Key, AllowedIPs, Endpoint/Port, Assigned Address). - (If provided) enable DDNS and record the hostname (e.g.
yourfleet.tplinkdns.com). - In the WiCAN UI import the config OR fill fields manually using the DDNS hostname as the Endpoint.
- Save + Connect.
Notes / Caveats:
- ISP CGNAT: If your ISP places you behind Carrier Grade NAT, inbound UDP may not reach the router; you may need a cloud VPS relay or WireGuard “reverse tunnel” alternative.
- Port Conflicts: Ensure the chosen WireGuard UDP port isn’t already used by another VPN service.
- Keep Firmware Updated: Router VPN modules receive security patches—update them periodically.
- Backup: Export the router’s WireGuard client profile so you can quickly restore on another WiCAN unit.
If everything is normal, using the router route is the fastest path (often <5 minutes from zero to connected).
3. UI Overview (VPN Tab)
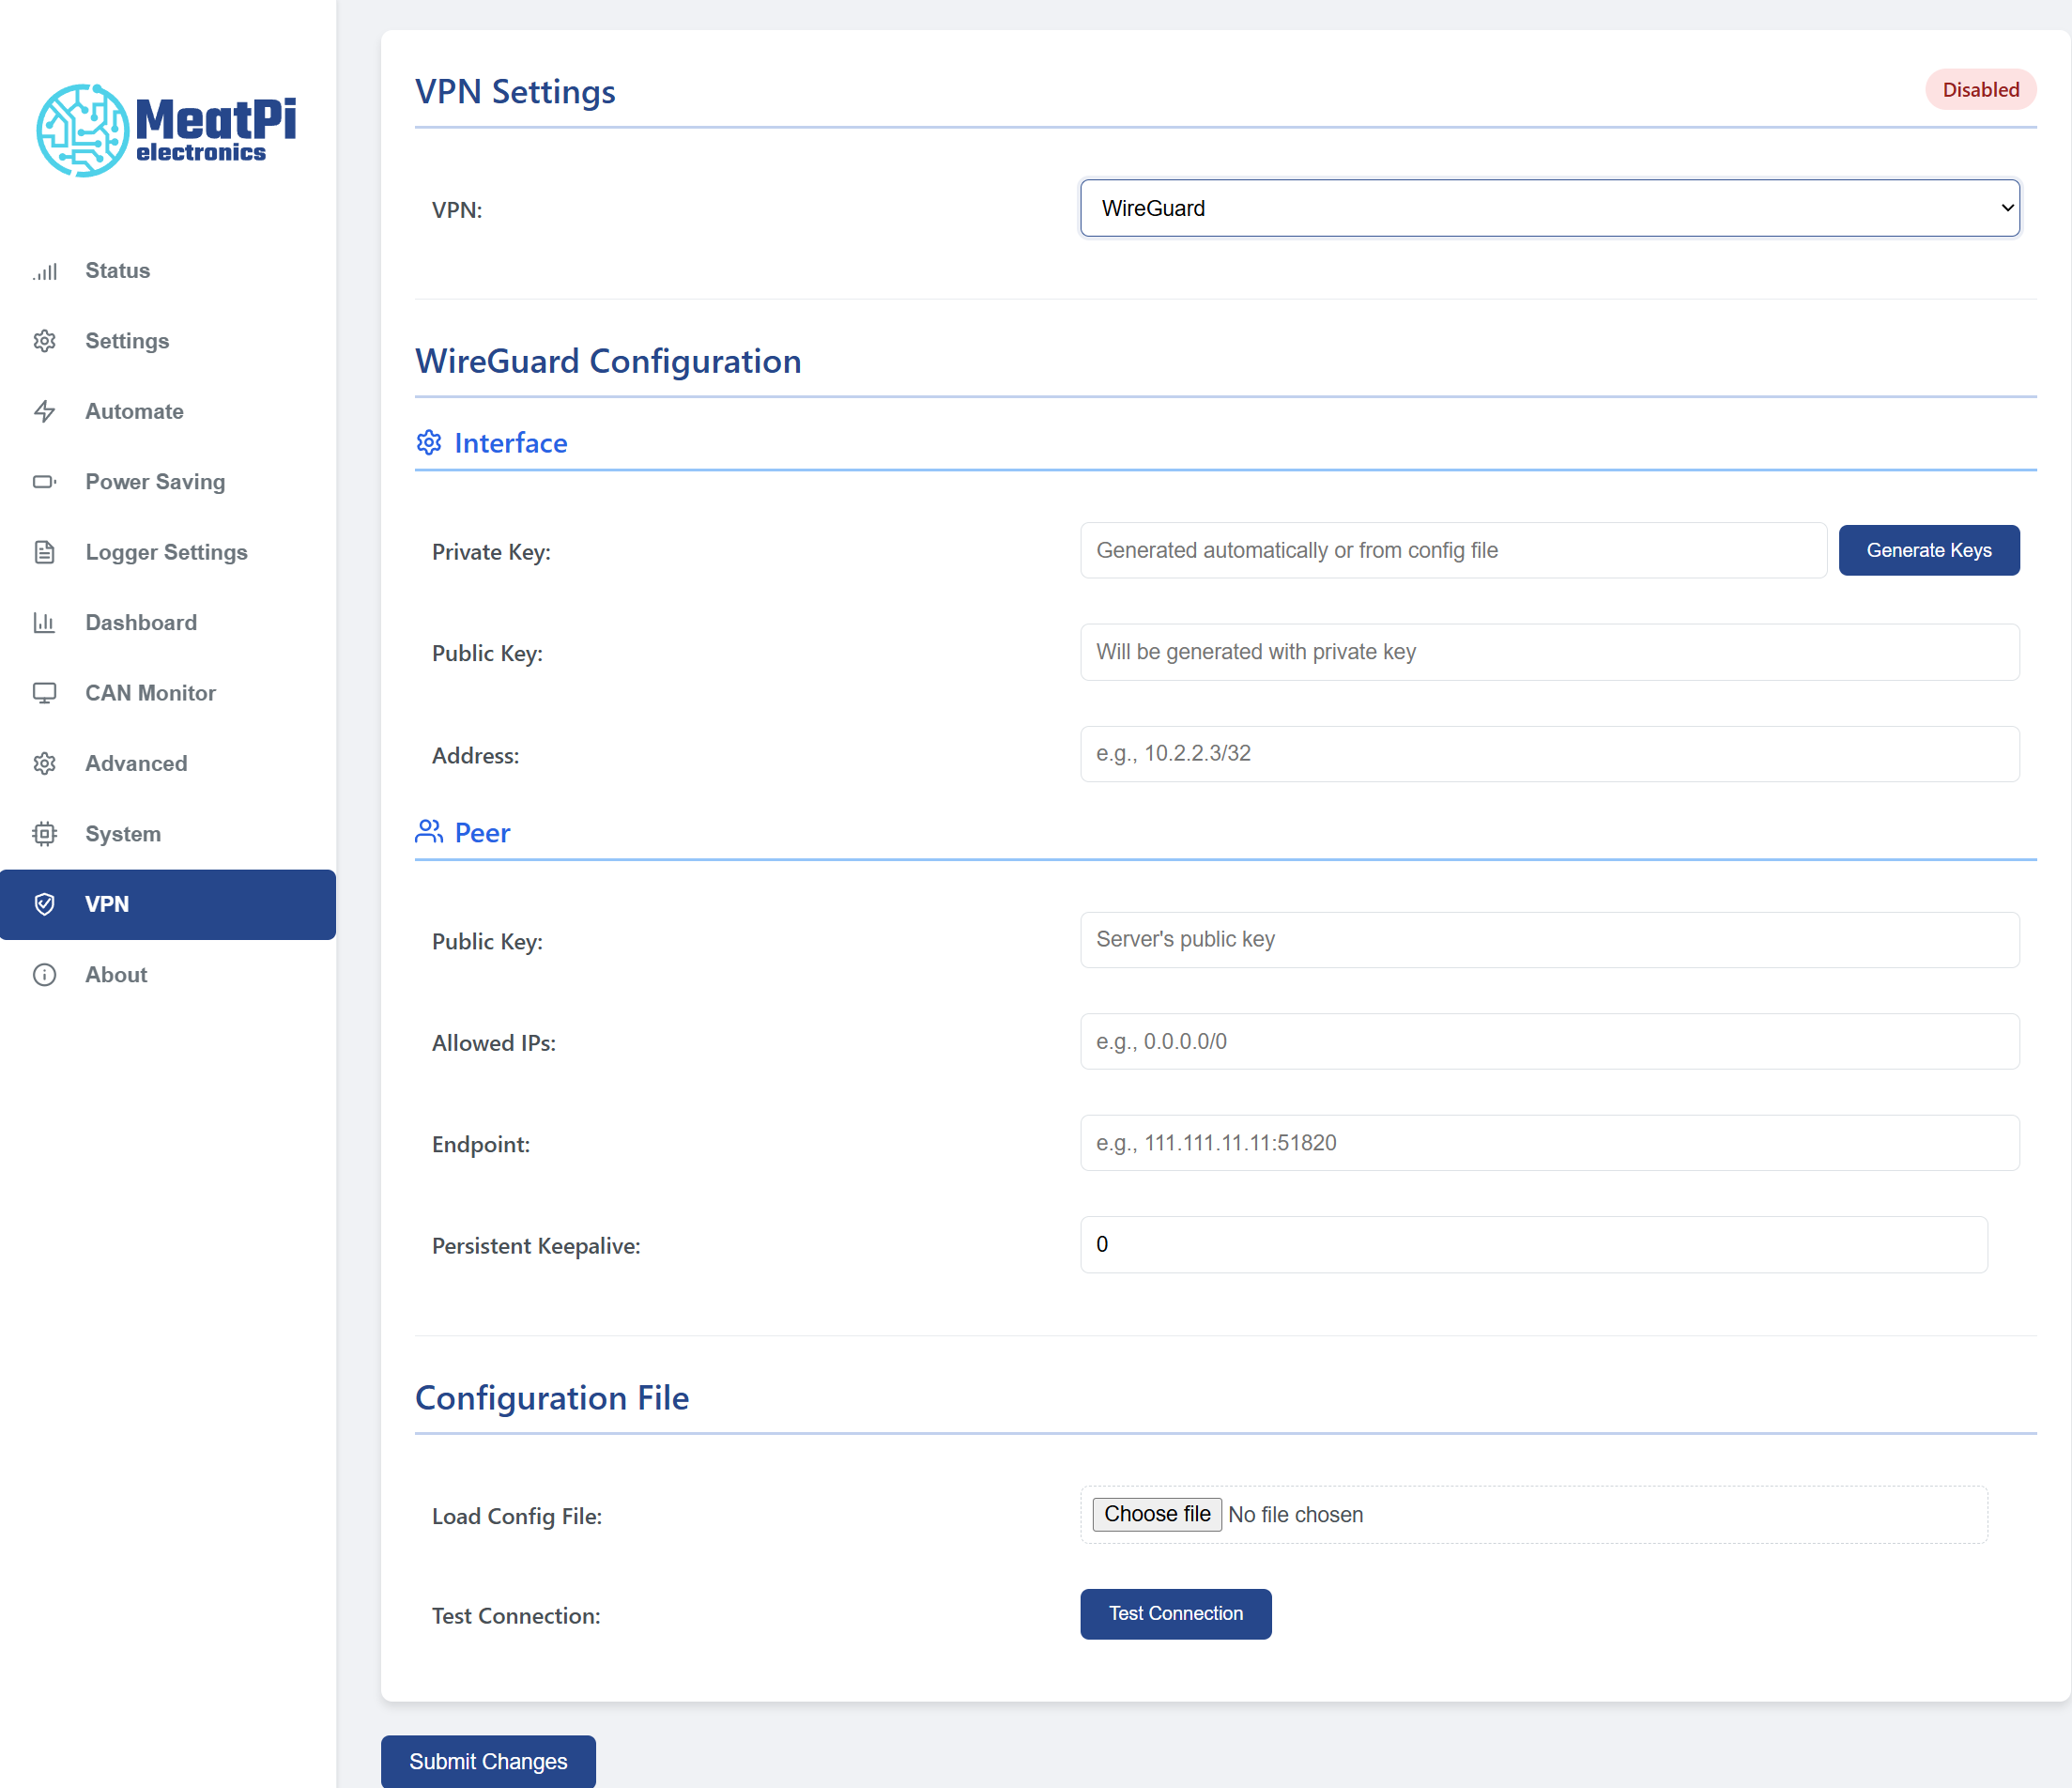
In the WiCAN web interface (served by the device):
- Open the device’s local web dashboard (e.g.
http://wican.localor its IP). - Click the VPN tab in the navigation bar.
- Select WireGuard from the VPN type selector (if multiple types are supported).
- You’ll see two main modes:
- Import Config (.conf)
- Manual Entry
A status panel shows current state: Disconnected, Connecting…, or Connected plus last error if any.
4. Quick Start – Import an Existing .conf File
If you already have a working WireGuard client config file (often named something like client-wican.conf):
- Go to VPN > WireGuard.
- Click Import / Load Config.
- Choose your
.conffile from your computer. A typical file looks like:[Interface] PrivateKey = <client_private_key> Address = 10.10.0.10/32 DNS = 10.10.0.1 [Peer] PublicKey = <server_public_key> PresharedKey = <optional_psk> AllowedIPs = 10.10.0.0/24 Endpoint = vpn.example.com:51820 PersistentKeepalive = 25 - Review the parsed values displayed (keys, endpoint, allowed IPs).
- Press Save.
- Press Connect (or it may auto‑connect after saving depending on firmware build).
- Verify status changes to Connected. You may also see bytes sent/received counters incrementing.
That’s it—your tunnel is live.
5. Manual Configuration Mode
Use this if you don’t have a full .conf file or want to edit values directly.
Fields you’ll typically see:
- Local (Interface) Private Key – The device’s private key (keep secret!)
- Local Public Key – Auto‑derived (read‑only) once a private key exists
- Assigned Tunnel Address – e.g.
10.10.0.10/32(provided by your server plan) - DNS (optional) – Custom DNS via tunnel (e.g.
10.10.0.1) - Peer (Server) Public Key – Provided by server
- Preshared Key (optional) – Extra security layer
- Endpoint (Host:Port) – e.g.
vpn.example.com:51820 - Allowed IPs – Networks to route through tunnel (comma-separated). Full tunnel:
0.0.0.0/0, ::/0; Split: just your private range. - Persistent Keepalive (s) – Common:
25if device is behind NAT; leave blank to disable.
Steps:
- Press Generate Keys (if starting from scratch) – this fills the Private/Public key fields.
- Fill in the remaining fields from your server configuration.
- Click Save.
- Click Connect.
- Confirm status shows Connected.
6. Generating Keys on WiCAN
If you do not already have a keypair:
- In Manual mode press Generate Keys.
- The UI shows the new Private Key and Public Key.
- Copy the Public Key and add it to your server’s WireGuard peer list with the device’s tunnel IP (e.g.
10.10.0.10/32). - After adding the peer server‑side, return and press Connect.
Security note: Do not share the private key. Only the public key should be distributed.
7. Exporting / Backing Up the Config
Once configured, you can:
- Press Download Config (if provided) to get a
.confsnapshot for backup. - Copy keys & settings manually and store in a password manager / secure docs.
If you regenerate keys you must update the server peer entry accordingly—otherwise the tunnel will fail.
8. Connection Status & Logs
Typical indicators:
- Status:
Disconnected/Connecting/Connected - Last Error: e.g.
Handshake timeout,DNS lookup failed,Invalid key - Counters: TX bytes / RX bytes
- (Optional) Recent log lines (handshake events)
If the UI exposes a Refresh or Reconnect button, use it after making adjustments.
9. Typical Use Patterns
| Use Case | Recommended Allowed IPs | Notes |
|---|---|---|
| Remote diagnostics only | Your private server subnet (e.g. 10.10.0.0/24) | Minimal routing, lower latency |
| Full remote management | 0.0.0.0/0 (and ::/0 if IPv6) | All traffic goes through VPN |
| Mixed / Split | Specific service subnets + maybe telemetry endpoint | Fine-grained control |
10. Security Best Practices
- Treat the device private key as confidential.
- Use a preshared key if your environment supports it (defense in depth).
- Limit
AllowedIPsto only what’s required (principle of least privilege). - Rotate keys periodically (e.g. every 6–12 months) or after suspected compromise.
- Keep firmware updated for the latest crypto patches.
11. Troubleshooting
| Symptom | Likely Cause | Fix |
|---|---|---|
| Stuck on Connecting | Server unreachable / DNS fail | Verify endpoint host resolves, port open (UDP), correct target (esp32 variant) has network |
| Disconnected immediately | Key mismatch | Re-check server peer public key and assigned address |
| No RX bytes | AllowedIPs mismatch or server route missing | Ensure server allows return path; confirm correct client tunnel IP |
| Handshake every few seconds | NAT keepalive need or unstable link | Set PersistentKeepalive=25; check cellular/WiFi signal |
| Works then stops | IP changed / server peer removed | Confirm server peer entry intact |
| Cannot reach internal service | Wrong AllowedIPs or firewall | Add subnet to AllowedIPs; open firewall rule |
Extra diagnostics (if UI exposes):
- View raw log lines for handshake timestamps.
- Check system time (major clock drift can break handshakes).
12. Frequently Asked
Q: Can I use multiple VPN profiles?
A: Current build typically supports one active WireGuard profile (confirm in UI). You can export, then switch by re-importing.
Q: Does WiCAN auto‑reconnect after power loss?
A: Yes—if the VPN profile was saved and set to auto‑start (depends on firmware build). Otherwise press Connect manually.
Q: Can I push configuration remotely?
A: Not directly via VPN itself; you must either pre-provision or use another remote management channel (future roadmap item).
Q: What MTU should I use?
A: Default often works. If experiencing fragmentation (especially over cellular), try lowering to 1280–1380.
13. Safe Key Rotation (Manual)
- Generate new keys (do not save yet if UI allows preview).
- Add the new public key to server (replace old one) and keep same tunnel IP.
- Save on WiCAN.
- Connect and verify traffic.
- Remove old key references anywhere else.
14. Removing / Disabling VPN
If you need to temporarily disable without losing settings:
- Press Disconnect.
- Toggle Auto Connect off (if present).
To fully remove: press Delete Config or clear all fields and Save.
15. Minimal Checklist (TL;DR)
- VPN tab → Select WireGuard.
- Import
.confOR Generate Keys + fill fields. - Save.
- Add / confirm peer on server (public key + IP).
- Connect → Status: Connected.
- Confirm RX/TX counters > 0.
16. Support / Next Steps
If issues persist, collect:
- Screenshot of settings (hide private key)
- Error / status log lines
- Server peer configuration snippet
Then contact support with firmware version string (shown on About/System page) and these details.
Document version: 1.0 (initial draft). Update as UI labels evolve.
- Overview
- WireGuard VPN Integration
- 1. What WireGuard Does on WiCAN
- 2. Prerequisites
- 3. UI Overview (VPN Tab)
- 4. Quick Start – Import an Existing .conf File
- 5. Manual Configuration Mode
- 6. Generating Keys on WiCAN
- 7. Exporting / Backing Up the Config
- 8. Connection Status & Logs
- 9. Typical Use Patterns
- 10. Security Best Practices
- 11. Troubleshooting
- 12. Frequently Asked
- 13. Safe Key Rotation (Manual)
- 14. Removing / Disabling VPN
- 15. Minimal Checklist (TL;DR)
- 16. Support / Next Steps